Castlevania Belmonts Curse Map
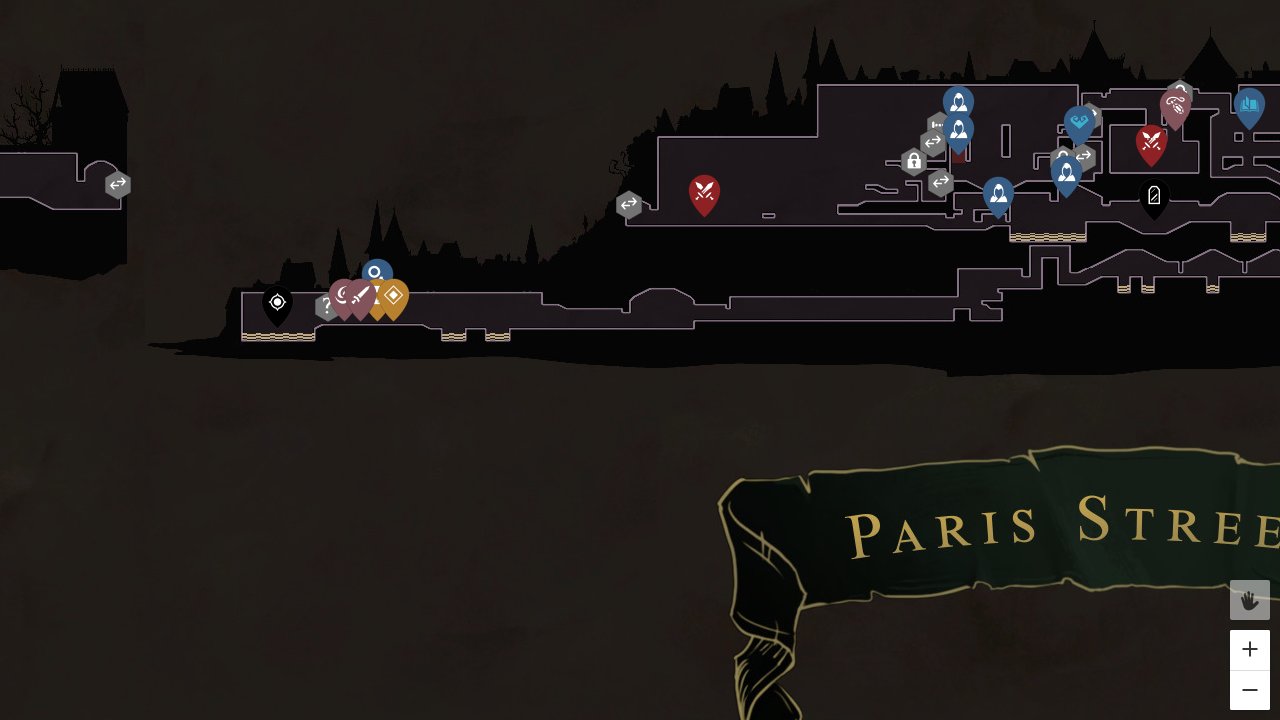
The Castlevania Belmonts Curse Map on GameMappers.com gives players a fully interactive tool to explore the Streets of Paris and track every major marker across six core categories. Whether you’re chasing down bosses, hunting collectibles, or piecing together quest objectives, this map layers all that information cleanly onto a single navigable view. It transforms what can feel like an overwhelming gothic labyrinth into a structured, manageable experience.
Castlevania: Belmont’s Curse blends fast-paced combat with deep exploration, and missing a critical item or misjudging a transition point can send your run sideways quickly. That’s exactly where the Castlevania Belmonts Curse Map earns its value – it pinpoints everything from Mirror of Life locations to Haunted Coffin spawns so you’re always moving with purpose, not guesswork. Every category on this map serves a direct gameplay function, and this guide breaks down exactly how to use it.

How to Use the Castlevania Belmonts Curse Map
Locations and Exploration: The Locations category anchors your movement through the Streets of Paris. Markers for Points of Interest, Mirrors of Life, Ferryman’s Wharf, Elevators, and Transition Mirrors give you a complete picture of how zones connect and where you can save or reposition. Knowing exactly where a Transition Mirror sits before you reach it means you can plan loops and backtracking without wasting time.
Enemies and Combat: Boss markers, Arena Battles, and Haunted Coffin locations are all plotted so you can anticipate high-difficulty encounters before they catch you off guard. Use these markers to decide when to farm a specific enemy type, when to detour around a fight you’re not ready for, and when to commit to a boss room with full resources in hand.
Loot and Resources: Equipment markers cover Arcana, Arcane Power, Relics, Weapons, and Character Skins, while Items include Chicken and Keepsakes. Filtering these layers lets you zero in on power upgrades or healing items depending on your immediate need. Nothing kills momentum faster than running past a weapon pickup you didn’t know existed.
Collectibles and Secrets: Red Books, Blue Books, Wise Heart Fragments, Brave Heart Fragments, Clues, and Statues all appear under the Collectibles category. These markers are essential for completionists because many are tucked into corners that don’t advertise themselves. Checking them off as you go keeps your progress visible and prevents end-game backtracking across the entire Streets of Paris.
Quests and Objectives: Objective markers and Tarot Card locations form the Quest category. These keep your narrative and side content aligned so you’re never questioning whether you’ve missed a story beat or a critical card pickup. Tarot Cards in particular can be easy to overlook without a dedicated marker system pointing the way.
What the Castlevania Belmonts Curse Map Can Do
Improve Routing Through the Streets of Paris
The Streets of Paris is a dense, vertically layered environment where Elevators and Transition Mirrors determine how quickly you move between sections. Having all these navigation points visible on the map at once lets you build efficient routes that minimize backtracking. Instead of discovering connections by accident, you can plan a deliberate path that hits your priority targets – whether that’s a boss room, a collectible cluster, or a Mirror of Life – in the most logical sequence.
Track Collectibles Without Missing a Single Entry
With six distinct collectible types on the map – Red Books, Blue Books, Wise Heart Fragments, Brave Heart Fragments, Clues, and Statues – keeping mental track of what you’ve found becomes impractical fast. The interactive map lets you check off each marker as you collect it, giving you a live completion percentage and a clear view of what remains. This system is especially useful for Heart Fragments, where incomplete sets mean you’re leaving permanent upgrades on the table.
Manage Combat Encounters Strategically
Boss markers and Arena Battle locations let you gauge encounter density before committing to an area. If you’re low on Chicken pickups or haven’t secured a strong enough Weapon yet, you can identify exactly where those resources sit relative to an upcoming boss and loop back to grab them first. Haunted Coffin markers add another layer, letting you decide whether to engage or route around encounters based on your current build.
Support Equipment and Progression Planning
The Equipment category covers the full progression toolkit – Arcana, Arcane Power, Relics, Weapons, and Character Skins. Knowing where every piece sits on the map before you reach it lets you make deliberate choices about upgrade priority. If a powerful Relic is two zones ahead, you can push toward it with confidence rather than spending resources upgrading gear you’ll replace immediately.
Keep Quest Progress Organized
Objective markers and Tarot Card locations prevent quest content from falling through the cracks during longer play sessions. Tarot Cards are scattered throughout the Streets of Paris and carry real significance for certain progression paths, so having their positions confirmed on the map removes the guesswork entirely. Objective markers ensure you always know what the game expects of you next, keeping the pacing sharp and intentional.
Castlevania Belmonts Curse Map Overview
A quick reference for the key features of this interactive map.
| Category | Example | Why It Matters |
|---|---|---|
| Locations | Mirror of Life, Transition Mirror | Saves your position and reveals how zones connect across the Streets of Paris |
| Equipment | Arcana, Relic, Weapon | Lets you plan your build path and avoid missing permanent power upgrades |
| Collectibles | Wise Heart Fragment, Red Book | Tracks all six collectible types so nothing gets missed on a completionist run |
| Enemies | Boss, Arena Battle, Haunted Coffin | Prepares you for high-difficulty encounters and lets you farm or avoid strategically |
| Quests | Tarot Card, Objective | Keeps quest progress and collectible card locations visible and organized |
Frequently Asked Questions
What does the Castlevania Belmonts Curse Map cover?
The Castlevania Belmonts Curse Map covers the entire Streets of Paris region with markers across six categories: Locations, Equipment, Collectibles, Items, Quests, and Enemies. Every marker type – from Mirrors of Life and Transition Mirrors to Bosses and Tarot Cards – appears on a single interactive map layer that you can filter based on your current focus.
How does this map help with completion?
The map lets you check off markers as you collect or complete them, so your completion progress stays visible in real time. With collectible types like Red Books, Blue Books, Statues, Clues, and Heart Fragments all tracked separately, you always know exactly what you’ve found and what still needs attention – without relying on in-game inventory screens or manual note-taking.
Are collectibles included on the map?
Yes. The Collectibles category includes six marker types: Red Book, Blue Book, Wise Heart Fragment, Brave Heart Fragment, Clue, and Statue. Every known collectible location across the Streets of Paris appears on the map, making it the most reliable way to pursue a full completion run without missing hidden or out-of-the-way pickups.
Does this map cover progression systems like equipment and relics?
Absolutely. The Equipment category marks every Arcana, Arcane Power, Relic, Weapon, and Character Skin location in the Streets of Paris. These markers let you plan your upgrade path ahead of time, prioritize the most impactful pickups for your build, and ensure you never accidentally skip a permanent power boost hidden in a side area.
Is the Castlevania Belmonts Curse Map complete?
The map is actively maintained and covers all currently known marker locations across the Streets of Paris. As the game’s community continues to explore and report findings, the map receives updates to reflect new discoveries. Checking back after major play sessions ensures you’re always working with the most current location data available.
Credit: Castlevania Belmonts Curse Map by MapGenie