![]()
The Legend Of Zelda Map
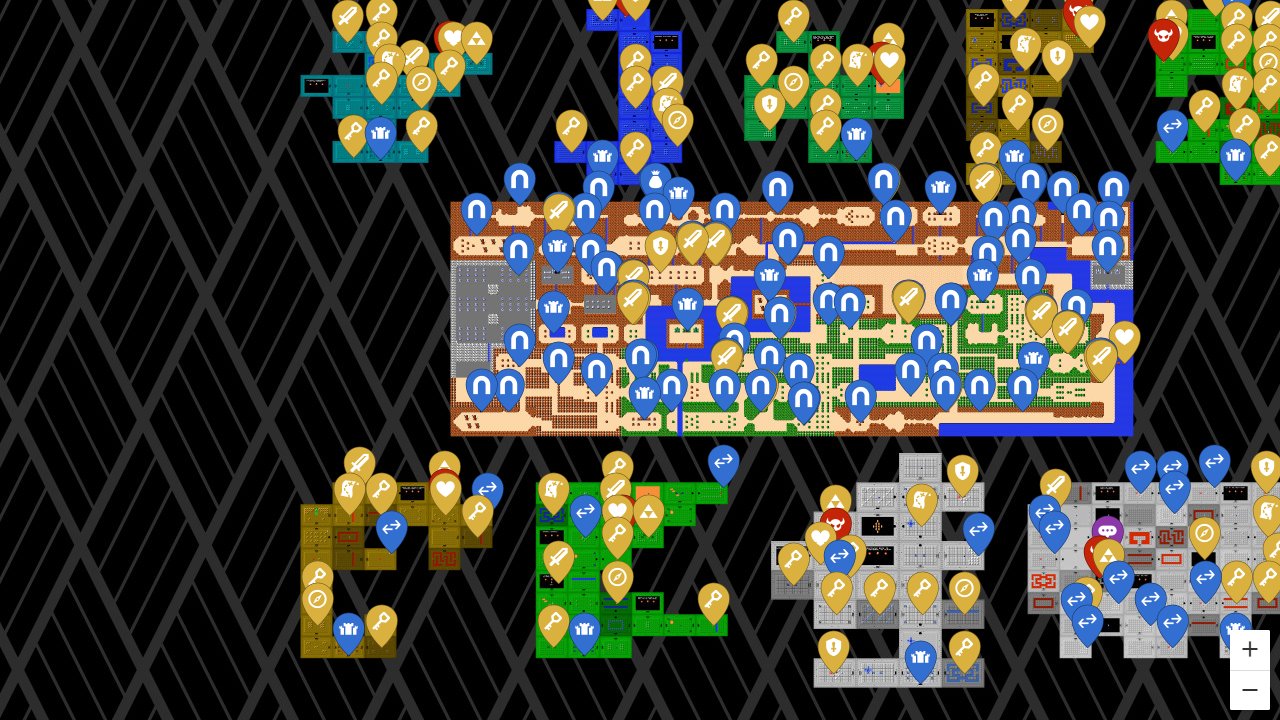
The Legend Of Zelda Map provides comprehensive coverage of both the First Quest and Second Quest adventures in Hyrule, tracking every cave entrance, dungeon location, shop, and secret passage that Link encounters during his legendary journey. This interactive mapping tool transforms the challenging exploration of the original NES classic into a more manageable adventure by revealing the precise locations of heart containers, equipment upgrades, key items, and Triforce fragments scattered across the overworld and hidden within labyrinthine dungeons.
The original Legend of Zelda deliberately obscured many of its secrets, requiring players to experiment with bombing walls, burning bushes, and moving blocks to uncover hidden passages and treasures. The Legend Of Zelda Map eliminates the frustration of endless searching while preserving the joy of discovery, allowing players to focus on mastering the game’s combat systems and puzzle mechanics rather than wandering aimlessly through identical-looking screens.
Maps Covered
The interactive map system covers both major quest variants that define the complete Legend of Zelda experience. Hyrule First Quest represents the standard adventure path where Link begins his journey to rescue Princess Zelda and defeat Ganon, featuring the original dungeon layouts, enemy placements, and secret locations as designed by the development team. Hyrule Second Quest presents an entirely remixed version of Hyrule with different dungeon locations, altered enemy patterns, modified secret passages, and rearranged item placements that create a fresh challenge for players who have mastered the original quest.
These two quest variants share the same overworld geography but feature dramatically different content distribution, making the interactive map essential for navigating both experiences effectively. The Second Quest particularly benefits from mapping assistance due to its increased difficulty and deliberately obscured progression paths.
How to Use the The Legend Of Zelda Map
Locations and Exploration categories include Cave, Dungeon, Shop, and Underground Transition markers that reveal every entrance and passage throughout Hyrule. These markers eliminate the guesswork involved in finding secret caves hidden behind bombable walls or locating the correct dungeon entrances when multiple screens look nearly identical. Underground Transitions specifically track the warp passages and stairways that connect different areas of the overworld.
Essential Equipment and Progression encompasses Equipment, Heart Container, Key, Key Item, Map, and Triforce Fragment categories that track Link’s power progression throughout his adventure. Heart Containers mark the locations of permanent health upgrades hidden in dungeons and secret caves, while Equipment markers reveal where to find crucial items like the White Sword, Magical Shield, and Power Bracelet. Key Items include unique tools like the Recorder and magical keys needed for specific dungeons.
Navigation and Combat Support features Compass markers within dungeons and Boss locations that help players orient themselves within the complex maze-like structures of each dungeon. The Compass markers indicate not just the item locations but also the rooms where Link can find these essential navigation tools that reveal dungeon layouts. Boss markers prepare players for the challenging encounters that guard each dungeon’s Triforce fragment.
Interactive Elements and NPCs track the various characters and special interactions scattered throughout Hyrule, including the old men who provide hints, the merchants selling essential items, and the mysterious figures who offer cryptic advice about hidden secrets and dungeon strategies.
What the The Legend Of Zelda Map Can Do
Optimize Overworld Exploration Routes
The map eliminates the time-consuming process of systematically bombing every suspicious wall or burning every bush by revealing the exact locations of secret caves and hidden passages. Players can plan efficient routes that collect multiple heart containers, equipment upgrades, and key items in a single exploration session rather than making repeated trips across the vast Hyrule landscape.
Master Dungeon Navigation and Completion
Dungeon exploration becomes significantly more manageable when players can identify the locations of maps, compasses, keys, and boss chambers before entering. The interactive map reveals the optimal path through each dungeon’s maze-like structure, ensuring players collect essential items in the correct sequence and avoid getting trapped in rooms without the necessary keys or equipment.
Track Critical Equipment Upgrades
Equipment progression directly impacts Link’s survival capabilities, and the map ensures players never miss crucial upgrades like the Blue Ring for defense or the Magical Sword for increased attack power. The system tracks both the locations and the requirements for obtaining each piece of equipment, preventing players from attempting to collect items before meeting the necessary conditions.
Plan Second Quest Strategy
The Second Quest features dramatically different item placements and dungeon locations that can confuse players familiar with the First Quest layout. The interactive map system clearly distinguishes between quest variants, allowing players to develop separate strategies for each adventure and understand how the remixed content changes the optimal progression path.
Coordinate Triforce Fragment Collection
Completing either quest requires collecting all eight Triforce fragments from the various dungeons, and the map system helps players track their progress while planning the most efficient dungeon completion order. Some dungeons require items or abilities obtained from other dungeons, making strategic planning essential for smooth progression through Link’s adventure.
The Legend Of Zelda Map Overview
A quick reference for the key features of this interactive map.
| Category | Example | Why It Matters |
|---|---|---|
| Dungeon | Level 1 Eagle, Level 9 Death Mountain | Essential for Triforce fragment collection and quest progression |
| Heart Container | Hidden cave rewards, dungeon completion bonuses | Permanent health increases crucial for surviving later dungeons |
| Equipment | White Sword, Magical Shield, Power Bracelet | Direct impact on combat effectiveness and puzzle-solving ability |
| Cave | Secret money caves, item shops, hint rooms | Access to upgrade items, recovery supplies, and strategic information |
| Key Item | Recorder, Raft, Ladder, Magical Key | Required for accessing specific dungeons and overworld areas |
Frequently Asked Questions
What does this The Legend Of Zelda map cover?
The map covers both the First Quest and Second Quest versions of Hyrule, tracking all caves, dungeons, shops, underground transitions, equipment locations, heart containers, keys, key items, maps, compasses, Triforce fragments, bosses, and NPCs across both quest variants.
How does this map help with completion?
The map eliminates the trial-and-error exploration that characterizes the original game by revealing secret cave entrances, dungeon locations, and item placement. Players can complete both quests more efficiently by following optimal collection routes and understanding dungeon layouts before entering.
Are collectibles included?
Yes, the map tracks all major collectibles including heart containers for permanent health increases, equipment upgrades like swords and rings, Triforce fragments from each dungeon, and key items required for progression such as the Recorder and Raft.
Does this map cover progression systems?
The map supports Link’s progression by tracking equipment upgrades that increase combat effectiveness, heart containers that expand health capacity, and key items that unlock new areas. It also shows the sequence requirements for accessing certain dungeons and obtaining specific equipment.
Is this map complete?
The interactive map provides comprehensive coverage of both quest variants in the original Legend of Zelda, including all discoverable locations, items, and secrets. The mapping system accounts for the different layouts and item placements between the First Quest and Second Quest adventures.
Credit: The Legend Of Zelda Map by MapGenie