![]()
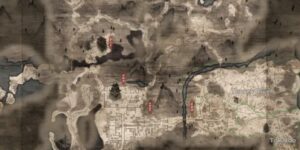
DREDGE Interactive Map
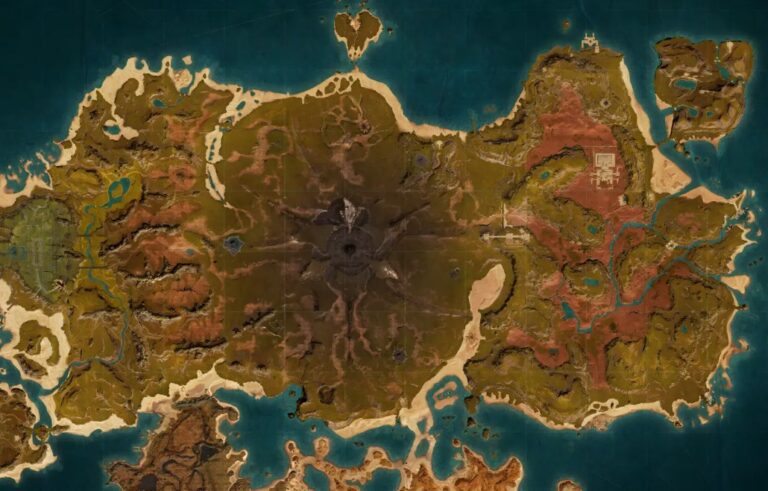
The DREDGE Map brings the whole coastline together so you can see where fish, relics, upgrades and hazards sit across every region. Since it also works as a full DREDGE Interactive Map, you get a clear picture of where different species appear, where dangers show up at night and which landmarks matter for quests or story moments. The game pushes you into foggy channels, quiet coves and creepy open water, and the map makes all of that feel a bit easier to manage. You can line up your fishing runs, plan safe routes and figure out where upgrades or rare materials show up without drifting around in circles. And because DREDGE mixes calm exploration with strange tension, having all the categories in one place helps you stay one step ahead of the weird things in the dark.
How to Use the DREDGE Maps
- Aquatic Life includes hundreds of fish types, crabs, deep-sea creatures and rare species.
- Danger markers include Giant Crabs, Sea Monster Sightings and Tornadoes.
- Landmark categories include Abandoned Ships, Boats, Cases, Crashed Planes, Debris piles, Dogs, Hooded Figures, Material Piles, People, Rock Slabs, Shrines and Statues.
- Materials include Belt Buckles, Broken Spectacles, Dog Tags, Doubloons, Earrings, Family Crests, Flags, Goblets, Iron Chains, Monocles, Mortar items, Rings, Sextants, Silver Plates, Silver Trinkets and Stone Tablets.
- Message Bottles include Letters.
- Relics include the major story items like the Pocket Watch, Band, Key, Music Box and Necklace.
- Ship Dock categories include Boatyards, Docks and Villages.
- Upgrade categories include Cloth, Lumber, Metal Scraps, Refined Metal and Research Parts.
What the Map Can Do
Regional Coverage Overview
Once you start looking at the DREDGE Map as a whole, the world feels way more connected. Each region has its own mood. Some coastlines feel calm and almost safe, while others kick up fog, storms or weird shapes that move where they shouldn’t. Aquatic Life is spread across these different areas, and the map helps you spot patterns fast. You’ll see where schools of common fish sit close to shore, where rarer species drift deeper and where dangerous fish lurk near trenches or ruins.
Landmarks help anchor everything. Abandoned Ships sit in places that hint at past wrecks, and Crashed Planes or Debris fields often hide quests or materials. Shrines show up in eerie spots and tie into puzzles that want specific fish offerings. Rock Slabs and Statues add their own flavor and give you a sense of how the world changed long before you arrived. The map lets you see how these spots link together, so planning a run through multiple islands becomes easier.
Ship Docks like Boatyards, Villages and Docks help set your routes too. Boatyards handle repair and upgrades. Villages handle trading or quests. Docks supply a safe place to rest when the panic meter starts climbing. Seeing all of these as a network helps you build cleaner loops.
Fishing Routes, Hazards and Collectible Hunting
Fishing is the core loop in DREDGE, and the DREDGE Interactive Map makes it much easier to understand where everything shows up. Common catches like Anchovy, Blue Mackerel and Grey Mullet stay close to calm shorelines. Once you drift farther out, you’ll run into larger species like Blackfin Tuna, Tarpon or Hammerhead Sharks. Deep-water fish push things even further. Viperfish, Fangtooth, Barreleye and the Gulper Eel live in places where the water feels wrong in a way you can’t always explain. Crabs fill in the shallow zones, with Rock Crab, Horseshoe Crab and Spider Crab popping up around quieter pockets. Lobsters sit in deeper trenches and show up in stranger spots. Seeing all of this together on the map helps you plan cleaner loops without wasting daylight.
Tidal patterns and biome shifts also shape the fish distribution. Bright shallows might hold Firefly Squid or Arrow Squid, while darker coves lean into things like Loosejaw or Snailfish. Once you start noticing the clusters, it becomes easier to travel between regions with a purpose instead of hoping you bump into what you need.
Hazards, Materials and Rare Finds
Danger plays a huge part in how you move. Giant Crabs slow you down in tight channels, Tornadoes drift unpredictably across open water and Sea Monster Sightings create routes you’ll want to avoid at night. Since panic climbs fast once the sun goes down, the map helps keep your travel paths safe while still letting you chase fish, quests or materials.
Collectibles add another layer to your runs. Doubloons, Rings, Earrings, Flags and Goblets hide near wrecks or older ruins, and they create natural paths that pull you through more dangerous parts of the map. Silver Plates, Stone Tablets, Mortar Frames and Monocles tie into worldbuilding and often sit near abandoned structures. Each item hints at something older beneath the surface, and the map helps you grab them without looping around the same islands dozens of times.
Relics sit in the most important spots of all. They guide the main story and usually sit behind strange puzzles or creepy geography. Letters in Message Bottles drift along currents or rest on lonely beaches and help fill in the past. All of these collectibles turn the world into a big, layered scavenger hunt, and having their locations marked keeps the flow steady.

Progression, Upgrades and Long-Term Planning
Upgrades shift how you travel. Cloth, Lumber and Metal Scraps appear everywhere, so early upgrades come easily. Refined Metal, though, sits only in a few dangerous spots, so seeing those on the map helps you plan a safer run. Research Parts appear in logical places, usually near wrecks or puzzle spots, and the map helps you grab enough of them to unlock better engines, nets or rods.
Once you mix upgrades with fishing paths and landmarks, the world settles into a natural rhythm. Maybe you start with a small loop to catch COD or Grey Mullet. Then you head deeper to chase Barracuda or Snake Mackerel. When panic creeps in, you cut toward a Village, drop off materials and repair your hull. After that, maybe you chase a Relic, explore a Shrine or grab a few rare crabs for good money. The map keeps all of this manageable so you don’t get overwhelmed by the fog or the weird stuff waiting past the lights.
And when you’re down to the last few collectibles, the map saves you a ton of guessing. You’ll see exactly where you missed a rare species, a material cluster or a landmark tied to a side task.
Map Table
Here’s a quick look at a few of the categories on the map.
| Category | Example Item | Type |
|---|---|---|
| Angler Fish | Deep Sea Catch | Aquatic Life |
| Shrine | Offering Site | Landmark |
| Doubloon | Coin Treasure | Material |
| Boatyard | Repair Station | Ship Dock |
| Research Parts | Upgrade Resource | Upgrade |
FAQs
Does the map include every fish species?
Yes, every fish, crab and deep-sea catch is marked.
Are dangers like sea monsters shown?
They are. All sightings and hazard points appear.
Where can I find relics?
Every relic location is included on the map.
Does the map include upgrade materials?
Yep. Cloth, Lumber, Metal Scraps, Refined Metal and Research Parts all show up.
Is this the full DREDGE Interactive Map?
Yes. Every category across the entire world is included.
Credit: DREDGE Map by Wand